Pages

Thursday, 29 August 2013

No flowers!

Hello lovely people,

This might be a bit of a long post as I have lots to tell you, so are you sitting comfortably?  Then I'll begin...

First up, it's Liliday and this week our challenge theme at Lili's Little Fairies  is...
No Flowers

Our wonderful sponsor is Iva Nova Chest with a lovely goodie bag up for grabs :-D


My card is a fairly simple one and I have used hearts to embellish it instead of flowers, which I rather like...I may do this again!


I go back to this stamp time and again as it is such a lovely image and can be used for a number of occasions, hence the slightly non-specific tag!


Card recipe;
DP: Maja Design -Vintage Summer Basics
Scalloped edge: Martha Stewart edge punch
Hearts: cut with Cricut
Ribbon: from stash
Tag: Sentiment tags from LOTV
Pearls: from The Hobby House

Copic colours;
Skin: E0000/000/00/51 & R30
Hair: E44
Her dress/shoes: BG10/11/53
Her hat: E40/41/42
His shirt: BG53/57
His shorts/gloves: E41/42/43
His apron: W4/5/6
His hat: W0/1/3
His boots/tree/shear handles: E44/47
Tree leaves: BG93/96/99
Pot: BG 90/93/96

Now, onto the second part of my post and I have some news to share.  Time change and we Fairies are changing with them.  This will be the last ever challenge as Lili's Little Fairies.  No, please don't be too sad and read on...

We have had a blast as LLF but it is time for a new start so from next week (5th September) we are becoming Crafty Little Fairies and will have a brand new look :-)  Here's a little taster...


Something else new and we think very exciting - we are opening our challenge up for you to use images other than LOTV.  So, you can still use your Lili's and we would love to see them, but you can also use other images too.  How cool is that?  I and the other Fairies will continue to share our love of Lili with you but this does mean more of you will be able to join in the challenges with us.

So, we hope you are as excited about all this as we are and hope to see you next week for the first ever Crafty Little Fairies Challenge!  It's the turn of the Blue Fairies (yes, we get new team names too!) to share their lovely creations but some of the Pink Fairies are so excited that they may just play along too!

If this weeks theme seems tough then just head over to Lili's Little Fairies for some awesome inspiration, then put away those flowers and join in our challenge!

If you need any more incentive to join in, we also have TWO £10 vouchers from LOTV to give away to wish us luck in our new venture - woohoo!

Thanks for visiting,

Hugs,
Kat xx

Wednesday, 28 August 2013

Back to school

Hello lovely people,

I hope you all had a lovely bank holiday weekend.  Mine consisted of a beer festival on Saturday, recovering/working (yes, really!) on Sunday and then a long walk with Dr Hubby on Monday so pretty perfect apart from the working bit.

Today I have taken a mini break from DT work to create a card for a couple of challenges and I used the current sketch from Papertake Weekly;


This was a lovely versatile sketch, which I have rotated 90 degrees to the right and angled some of the panels.  This card seemed to demand a clean layout... just snuck in a little bit of stitching and some twine!  I punched the notebook edge with my Bind-it-all and ripped the holes a little.


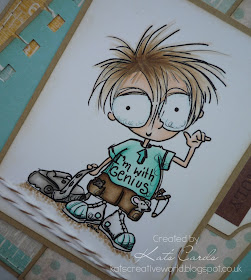
I don't have any kids to send back to school but I just had to colour up this gorgeously cute little chap :-)


Card recipe;
DP: Fancy Pants - Park Bench
Twine: from The Ribbon Girl

Copic colours;
Skin: E0000/000/00/51
Hair: E41/42/43/44
T shirt / shoes: BG10/11/13
Bag / shoes: W1-6
Ground: E40/41/42/42

I would like to enter this card in the following challenges;
1.  Papertake Weekly (sketch #82)
2.  Tiddly Inks (back to school)
3.  Simon Says Stamp (anything goes)

Thanks for visiting and please do say hello if you have time :-)

Hugs,
Kat xx

Saturday, 24 August 2013

Tutorial - stitching

Hello lovely people,

I have had quite a few comments/queries about my stitching so I thought I would share a little photo tutorial on how I do it.
If you're not interested please feel free to skip on down to my Totally Gorjuss DT post below; I will not be remotely offended!

First off, I do the stitching by hand ... ok, maybe that's obvious because if I used a machine then a tutorial would be rather pointless!

Here's what I use: a cutting mat, a Tonic Studios Tim Holtz pokey tool (the rubber on this started flaking almost immediately but it works fine), a fine needle and some DMC white embroidery thread;

I start in one corner and poke holes about half way along, the spacing is by eye;

Then I start from the other corner and poke holes towards the ones I have already done.  I stop when the gap looks the right size for 3 more holes;

I add the hole in the middle of the gap;

Finally I fill in the 2 remaining holes either side of the last hole I made.  This seems to mostly avoid having the wrong size gap at the end, although I have been known to get it wrong!

For the stitching part I do backstitch with a fine needle;

I tape the ends down on the back although I realise now that my tape is almost invisible!

I also cheat!  If I know I am going to be covering some of the lower layers up then I don't bother to stitch the non-visible parts :-)

Since I do a lot of this just by 'what looks right' I appreciate it may be a bit daunting for some, but I like doing it by hand and trust me, you get a lot better with practice.  Besides, I reckon it looks better if it isn't too perfect!

I hope you enjoyed my little tutorial and happy stitching :-)  Oh, and if you want to see the finished article it's below this post.

Thanks for visiting,

Hugs,
Kat xx

Ribbons and bows

Hello lovely people,

Since I have also posted a tutorial today I will try to keep this post short and sweet!  We have a new challenge at Totally Gorjuss and our nice easy theme this week is...
Bows
I love to use ribbon and twine on my cards so this was never going to be a problem for me :-)
I thought that using 4 squares of card to make a patchwork-ish background was a really good idea until I had to line them all up; I think I got them straight and even in the end!


I kind of kept with the theme idea for the image as I have used Ribbons Fairy from Saturated Canary.  The super talented Krista has just released a whole load of utterly gorgeous fairies and I think I might have to buy the rest before long!


Card recipe;
DP: Maja Designs - Vintage Spring Basics
Fancy edge: Martha Stewart edge punch
Seam binding / pearls / button twine: Wild Orchid Crafts
Button: from stash

Copic colours;
Skin: E0000/000/00/51 & R30
Hair: E42/43/44
Dress: BV0000/000/00/01
Wings: RV0000/000 & BV0000/000
Leaf: G40 & YG61/63 & G94


I would like to enter this card in the following challenges;
1.  Saturated Canary (winged things)
2.  Bunny Zoe (bingo - button/sparkle/pearls)
3.  Copic Marker Europe (favourite colours - lilac/green)
4.  'ABC' (lots of layers)

Please do head over to Totally Gorjuss to see what the rest of the Gorjussettes have created.
We are sponsored by The Ribbon Girl this week so show us your pretty bows for a chance to win :-)

Thanks for visiting,

Hugs,
Kat xx

Thursday, 22 August 2013

Kiss kiss

Hello lovely people,

I think I have just about recovered from all the excitement of In The Pink's birthday celebrations now.  But wait, there is one more little bit of excitement because I had some hidden candy to give away to one entrant into our challenge last week and that person is...
No.19 - Rosietoes
Congrats to you and please use the contact form on the left side bar to claim your prize of a lovely collection of pink ribbons :-)

Onto a new challenge now and this week our theme is...
KISS (Keep It Sweet & Simple)
The hardest part of this card was getting the sentiment straight as it wasn't a clear stamp so I couldn't see exactly where I was putting it.  I was so happy when it came out straight and in the right spot as I had already coloured the image by then...yeah, could have planned that better but thank goodness it was ok!


I just adore this sweet Saturated Canary image (I know, I say that about all of them but it's true every time!) as I bought it a while back and haven't used it until now.  I can't believe I left her hanging like that, but I did buy quite a few and some of the other haven't seen daylight yet either!


Card recipe;
DP: MME Lost & Found - Madison Avenue
Sentiment: Amy R - So wordy sentiments

Copic colours;
Skin: E0000/000/00/51 & R30
Eyes: B0000/000/00
Hair: E41/42/43/44
Dress: RV0000 & R81/83/85 & RV11/32/34
Shoes: T1/2/3/4

I would like to enter this card in the following challenges;
1.  Loves Rubber Stamps (round or square cards)

I know that the KISS theme sometimes freaks people out but check out the awesome creations from the rest of the DT over at In The Pink and you'll see that it's not so hard really!

Thanks for visiting,

Hugs,
Kat xx

Saturday, 17 August 2013

A little note

Hello lovely people,

I have slightly lost track of what day it is as I have had a couple of days off work and been with Dr Hubby to visit his aunt in Essex.  We were able to visit RHS Hyde Hall AND Beth Chatto's garden while we were there so I took away much inspiration and a few plants ;-)

Back at home I have been catching up visiting my friends in blogland and I would like to say hello to my new followers - I am so honoured that you chose to follow me and hope you enjoy my creations :-)

So, now I have got my head round the fact that it is Saturday, it must be time for a new challenge at Totally Gorjuss and this week our theme is...
Die Cuts and/or Punches
We are sponsored this week by Heather's Hobbie Haven and it is just that, a haven for all crafters and especially for the lucky winner of our challenge!

I have made really simple post-it note holder and covered all the bases with both die cuts (manual and electronic) and punches!


Apart from the pearls I tried to keep this fairly flat so it would actually be practical to use.


Here is a little shot of the inside, which, as you can see, I kept really simple as it isn't going to be particularly visible and of course, it has to be able to close properly!


Card recipe;
DP: Kaisercraft - Tigerlilly
Scalloped edge: Magnilia DooHickey Die (Tilda lace)
Flowers: cut with Cricut
Swirl: Marianne Designs Die (Anja's Vintage Swirls)
Butterflies: a very old nameless punch!
Seam binding / pearls: from Wild Orchid Crafts

I would like to enter this card in the As You Like It Challenge where they want to see your fave ribbon/twine - mine is seam binding because it is so pretty and comes in so many lovely colours.

I hope you have time to pop over to Totally Gorjuss and see the lovely creations from my teamies;  there is quite a bit of pink this week... totally unplanned but who doesn't love a bit of pink?!

Thanks for visiting and I hope you have a lovely weekend; I will be dividing my time between my craft room and the garden :-)

Hugs,
Kat xx

Thursday, 15 August 2013

A little bit shabby

Hello lovely people,

So today is a super lovely Thursday as not only is it time for a new challenge at Lili's Little Fairies but I have a couple of days off work - hurrah!  Providing Mr Blogger does his thing I will be spending a few days with Dr Hubby and my Aunt-in-Law when this posts :-)

I guess you are all waiting to find out our theme this week, well it is...
Vintage or Shabby Chic

Our sponsor this week is Live and Love Crafts and their store is stuffed full of gorgeous treats for our lucky winner to splurge on :-D

The LOTV Pretty Vintage stamps are totally perfect for this theme (the clue is in the name!) and I haven't made a new baby card for a while so here you go...


I used plenty of TH Distress Ink in Frayed Burlap round the edges of the DP and used the same ink to stamp a faint border onto the DP for extra shabby chic-ness.  Of course, it wouldn't be complete without a smattering of Frantage round the sentiment and also on the flowers :-)


Card recipe;
DP: Maja Designs Vintage Spring Basics (available from LLC)
Background stamps: Grunge Corners from LOTV
Flowers / pearls / pearl brads: from Wild Orchid Crafts
Swirls: Marianne Designs Creatables - Anja's Vintage Swirls
Frantage: Stampendous Shabby White (available from LLC)

I would like to enter this card in the following challenges;
1.  Live and Love Crafts (warm or cool colours - as you can see I have gone for cool)
2.  Wild Orchid Crafts (anything goes)

Check out all the lovely shabby chic and vintage creations from the rest of the Fairies and then let your imagination run wild with pretty vintage colours and shabby embellishments :-)

Thanks for visiting,

Hugs,
Kat xx

Saturday, 10 August 2013

Hot hot hot...

Hello lovely people,

Well hello there weekend!  It's going to be a busy one as Dr Hubby and I are looking after our niece and nephew to give their parents a bit of a break.   So, we have activities planned, including crafty ones of course, and the house is stocked with cake, chocolate and ice cream as bribes ;-)

Firstly though there is the little matter of a new challenge at Totally Gorjuss and this week the theme is...
Hot Colours
I did groan a little at this one as it's a bit out of my comfort zone but that's what a challenge is all about isn't it?!
This Saturated Canary image immediately sprang to mind though and I hope this is hot enough for you...


This is the first time I have coloured up this gorgeous image and I really enjoyed it :-)  I had my colour advisor (AKA my Mum) with me and she was most helpful!


Card recipe;
DP: 
Flower: from Wild Orchid Crafts
Twine / button: from stash

Copic colours;
Skin: E0000/000/00/51 & R30
Hair: E23/57/59
Eyes: E23/57
Bikini: R27/29 & BG07/09 & Y15
Burger: E30/31/33 & YG25/17 & E47/49 & R27/29

I would like to enter this card in the following challenges;
1.  Saturated Canary (set your creativity free)
2.  A Creative Romance (beach babes)

For more hot hot hot cards head over to Totally Gorjuss to see what my teamies have created and if you enter our challenge you have a chance to win a prize from our sponsors, Crafter's Companion.

I hope you all have a lovely weekend whatever you are up to :-)

Thanks for visiting,

Hugs,
Kat xx

Thursday, 8 August 2013

PINK!

Hello lovely people,

I'm so excited to be able to tell you that I am now on the DT for In The Pink! Yes, I am a Pink Lady :-D
If you visit my blog regularly you will know that I LOVE making pink cards so this is absolute heaven for me!

Ok, onto our challenge for this fortnight and since In The Pink is one year old today and our very own Rizzo is celebrating a special birthday this week, there was only one possible theme we could go for...
Birthday!
Even better we have two, yes TWO, awesome sponsors to help us celebrate;

Winner can choose two digi images (not sentiments, watermarks or sets)


Winner receives a £10 voucher

I am absolutely in love with the new limited edition Sofiero papers from Maja Design and guess what?  They are pink!  I have teamed them up with one of the fab Stamping Bella images for this birthday card;


For some reason I often end up paper piecing the dresses on these images and then just add a little extra shading to them.  Of course, I just *had* to add a touch of Glamour Dust to finish it off :-)


Card recipe;
Image: Uptown girl Isabella loves her ice cream from Stamping Bella
DP: Maja Designs - Sofiero
Lace: from stash (via my grandmothers!)
Flowers / pearls: from Wild Orchid Crafts

Copic colours;
Skin: E0000/000/00/51 & R30
Hair: E41/42/43
Ice cream: RV0000/000/00 & RV10/11 & YR30/blender
Cone: E53/55
Skirt: teeny bit of shading with Rv0000/000/00
Grass: YG61/63

I would like to enter this card in the following challenges;
1.  Papertake Weekly (anything goes)
2.  Inky Chicks (lovely lace)

I am so excited to have joined In The Pink at this happy time and as if all the above wasn't enough some of the DT have hidden candy so please show us some love and leave a little comment on our blogs to be in with a chance to win some :-D

For lots of inspiration head over to In The Pink to see what the other Pink Ladies have made and then show us your pink birthday creations :-)

Before I go, here's another little something I made a couple of weeks ago...Happy Birthday Rizzo...sorry you can't actually eat it!


Thanks for visiting,

Hugs,
Kat xx

Sunday, 4 August 2013

A little sunshine

Evening lovely people,

I was intending to post this earlier but I got sidetracked downloading some new software to allow me more options for editing my snaps and adding a watermark.  I was hoping to use it for this post but realised I'm going to need a bit more time to figure out how to do the stuff I want to do, so watch this space...!

The sun may have gone away, temporarily I hope, but I have a sunny little card to share with you :-)  I am also blaming the lack of sun for the slightly shoddy photos and will update them if the sun re-appears!


Yes, I have added another Tiddly Inks image to my collection; they are just such fun to colour :-)  I think you can just about see the little glitter sprinkles on her ice cream...


Ok, I'm going to share one more angled view so you can see the stepper design properly;

Card recipe;
DP: Fancy Pants - Park Bench
Scalloped edge: Martha Stewart edge punch
Twine: from The Ribbon Girl
Butterflies: Impression Obsession die
Pearls: from The Hobby House

Copic colours;
Skin: E0000/000/00/51 & R30
Hair: E35/37/47
Skirt/shoes: BG13/15
Top: BG10/11
Flowers: Y17/19
Ice cream & cone: YR30/blender & E53/55

I would like to enter this card in the following challenges;
1.  Tiddly Inks (summer treats)
2.  A Little Bit Crafty (summer sun)
3.  Cute Card Thursday (anything goes)
4.  As You Like It (favourite fancy fold - stepper card)

I hope that has brought a little sunshine to you and thanks for visiting,

Hugs,
Kat xx

Saturday, 3 August 2013

To have and to hold

Hello lovely people,

Welcome to the weekend!  And that means it is time for a new challenge at Totally Gorjuss.  Our theme this week is...
Pearls
Well, aren't we just spoiling you with these lovely easy themes of late!

Pearls always make me think of wedding cards; the two are just a natural pairing, so I have made a wedding card using one of my new LOTV Pretty Vintage stamps.  They make such a lovely focal point, especially if you don't want a bride & groom type image.


The rest of the card just sort of made itself really :-)  I stamped the flowers with a text stamp using 'second-hand' ink i.e. I stamped it on some scrap paper first then on the flowers to get a nice muted result.  I also brushed a little distress ink round the edge of the petals for definition.
And then I added those all important pearls!


Card recipe;
DP: Maja Designs Vintage Summer Basics
Lacy edge: Martha Stewart edge punch
Flowers / seam binding: from Wild Orchid Crafts
Pearl flourishes (cut up a bit!): from The Hobby House

I would like to enter this card in the following challenges;
1.  ABC (S is for stitching)
1.  Simon Says Stamp (anything goes)

I hope you have time now to head over to Totally Gorjuss to see what the other Gorjussettes have come up with :-)
J&C Creations are our sponsor this week so show us your pearly creations for a chance to win a voucher to sped in their online store!

Thanks for visiting me,

Hugs,
Kat xx

Thursday, 1 August 2013

Here come the girls...

Hello lovely people,

Wow, can you believe that it is now August?!  Someone needs to tell that to the weather though - my garden is well watered so can we have the sun back now please?

You may have spotted that today is Thursday and you know what that means... a new challenge at Lili's Little Fairies and this week we have the theme of...
Here come the Girls
So, we want to see one of the many gorgeous LOTV stamps featuring girls, fairies or female bears.

Our sponsor this week is Crafty Ribbons with a £10 voucher so you could snap up some gorgeous girly ribbon treats if you win :-)

I love going back to old stamps I haven't used for a while and falling in love with them all over again, like this cute ballerina.


I based my card on this lovely sketch from the Papertake Weekly Challenge;


I am totally loving my new fancy rectangle dies and just about managed to squeeze the image onto this one!  I have added a little glamour dust to her tutu and hearts, and also around the sentiment circle.


I created the little memo pin myself; they are so easy to do, just wind some thin wire round a pen a couple of times then bend the wire at 90 degrees and voila!
I also like to match my pearls to my colour scheme so I buy lots of white pearls and colour them with Copics.


Card recipe;
DP: MME - Blush
Die cut rectangle: Spellbinders timeless rectangles
Seam binding / flowers / pearls: from Wild Orchid Crafts

Copic colours;
Skin: E0000/000/00/51 & R30
Hair: E40 & Y11/21
Leotard/shoes: RV0000/000/00/11
Tutu: RV0000/000/00
Ground: T0/1/2

I would like to enter this card in the following challenges;
1.  Papertake Weekly (sketch #81)
2.  Wild Orchid Crafts (birthday party)
3.  Divas by Design (favourite colour combo - pink with more pink!)

For loads more inspiration and beautiful girly cards head over to Lili's Little Fairies and see what my teamies have created.

Thanks for visiting,

Hugs,
Kat xx